Having just finished his first knitted scarf for the cold Canadian spring, we decided to make a crochet beanie for Grandpa. This was his first major crochet project. As a seven-year-old who wasn’t very detail-oriented, he found the counting for increases rather challenging, so I did the magic ring and the increase rounds. From there, he happily completed all the portions with one double crochet per stitch.
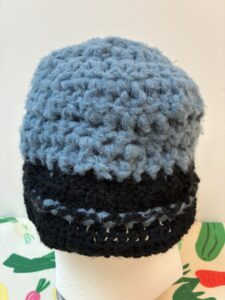
We ran out of bulky (#6) blue yarn halfway, so we continued with some #4 black yarn that we had on hand. To make the transition less awkward and look more like a part of the design, I left enough #6 yarn to make a #6 border in the #4 section. The ratio of “two #4 stitches per one #6 stitch” made the perfect transition.
Grandpa loved the beanie! He put it on immediately and wore it every day during our visit.
How to: Switch to a different yarn when starting a new round
“11 more days until we go to Canada!” My oldest child announced, for the third time, one morning. He has been counting down for weeks now. We rarely travel as a family, so every trip is a huge excitement for him (and of course, a huge undertaking for us parents).
– Pull a loop of the new yarn into the slip stitch that closed the previous round. Tighten the slip stitch of the old yarn. Now you are ready to start the new round!
– After finishing the round, weave in the loose end of the new yarn.
– If you plan to switch back to the old yarn soon, do not cut it. Instead, pull it to its new location, securing it by making chain stitches under the back side of the rows in between.
Materials
– Super bulky (#6) acrylic yarn, blue (we used Lion Brand Yarn Feels Like Butta Thick & Quick Super Bulky Yarn for Knitting, Orion Blue)
– Medium weight (#4) acrylic yarn, black (we used Red Heart Super Saver Yarn 312 Black)
– 9.0mm crochet hook (for the #6 yarn)
– 4.5mm crochet hook (for the #4 yarn)
Abbreviations
– CH = Chain
– SC = Single crochet
– DC = Double crochet
– DC2TOG = Double crochet 2 stitches together (double crochet decrease; see tutorial here)
– St(s) = Stitch(es)
– Sl st = slip stitch
Instructions
– Round 1: Begin with #6 yarn. Magic circle with CH 3 and 10DC. [10 sts]
– Round 2: CH 3. Increase every st, i.e., 2DC per st. Sl st to join. [20 sts]
– Round 3. CH 3. Increase every 2 sts, i.e., alternate DC and 2DC. Sl st to join. [30 sts]
– Round 4: CH 3. Increase every 3 sts, i.e., repeat 1DC-1DC-2DC. Sl st to join. [40 sts]
– Rounds 5-7: For the next 3 rounds, CH 3; 1 DC per st all around; sl st to join.
– Round 8: Switch to #4 yarn. Do not cut the #6 yarn. CH 3; make 2DC of #4 yarn in every st of #6 yarn; sl st to join.
– Round 9: Continue using #4 yarn. CH 3; DC every st; sl st to join.
– Round 10: Switch to #6 yarn. Do not cut the #4 yarn. CH 3; DC2TOG every two sts of #4 yarn; sl st to join.
– Round 11: Switch to #4 yarn. CH 3; make 2DC of #4 yarn in every st of #6 yarn; sl st to join.
– Round 12 and onward: Continue making DC rounds with #4 yarn until the beanie reaches your desired length. Optionally, do a final round of all SC (starting with CH 1) or all sl st for a cleaner finished look. Sl st to join, tie off, and weave in the loose end with a crochet hook or tapestry needle.